|
Go To | Photo Products Technical Information |
LabLine Training Index |
Training Series
Part Two
The Color Print & Printing
The 3M LabLine Training Series is a regular feature of the LabLine which will provide a primer on many subjects related to photofinishing technology, theory and application. The subject discussed in this issue will be Color Theory. The study of the color print and printing will be presented followed by a general knowledge quiz on the subject. The information in this and following features will furnish the reader with a ready reference on the subject and supply a source of information and materials to train new employees. Beginning with the summer issue, a multiple part series will be presented on Photographic Printing.
Photographic Color Prints
As with color negatives, there are two separate steps in the making of a color print; exposure and chemical processing.
In the exposure step, white light is passed through the negative onto a sheet or roll of color photographic paper. Color paper also has three light sensitive emulsion layers. One sensitive to red light, one to green and one to blue. These layers are coated on a white, opaque paper composite base.
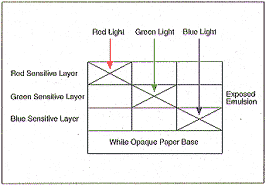
In each, a complementary colored dye filter will form if exposed and processed.
Typically, the arrangement of the dye layers in color
print paper, is the opposite of that in the film, with the
red sensitive layer on the surface and the blue layer next to
the base.
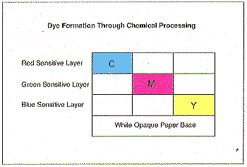
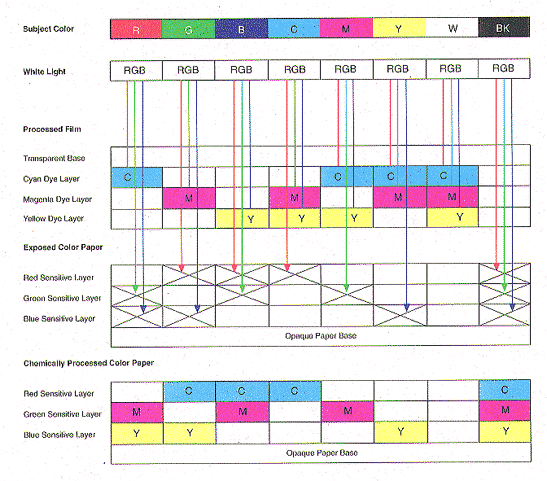
As with negative films, all the colors are represented by a specific combination of cyan, magenta and yellow dyes. The dyes that end up in the positive print are dependent on the color or colors of light that the negative allows to pass through and strike the color paper during printing.
On the following page are examples of different colored objects and the processed negative corresponding to each, and the resulting color paper after exposure and processing. Notice, that during printing, the emulsions of the film and paper face each other with the bases of each to the outside. This is done to prevent any light from being refracted as it passes through the emulsion and then through the base of the film.
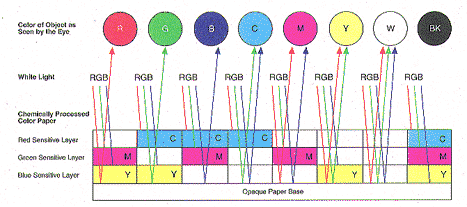
When viewing the final print, white light; or daylight balanced light, should be used. The colors the viewer sees are the colors of light that pass through the dyes or filters in the emulsion of the paper and then are reflected off the opaque paper base and back to the viewer's eye. Remember that the dye layers in the emulsion of the paper act as filters that pass and absorb light. The diagram below illustrates this for each of the primary and secondary colors. Through the correct combination of filters, the colors of the original subjects are correctly recreated in the print. Notice that a white object yields dye in
all three layers of the negative, which then block all light during printing. After the paper is processed, there is no dye formed in the paper thus white light reflects off of the white paper base and the object appears white. A black object will be represented by the formation of dye in all three layers which absorb all of the light, reflecting no light back to the viewer's eyes.
Dye Density
The overall density of the color recreated; that is how dark or light it appears, is dependent upon the densities of the dye layers in the film and paper. The density of a dye layer is directly proportional to the exposure it receives. For example, in both film and paper, the more exposure the red sensitive layer receives, the more dense the cyan dye will be in that layer. Provided our film processor is in control, we as photo finishers are concerned primarily with the density of each of the dye layers in the final print, for its exposure is the exposure we control in the lab. The original photographer controls the exposure of the film when the scene or subject is photographed.
Exposures consists of two variables; time and intensity. The time variable is the actual length of time that the film or paper is exposed to light. The intensity variable is the relative brightness of the light source used for the exposure.
Typically, a printer's exposure system employs negative sensors which look at the light transmitted through the negative. The printer then, uses this information to determine the amount of time each layer of paper should be exposed to produce a good final print. (The printer uses the negative sensor information along with the information and procedures programmed within it by your printer technician and the printer's manufacturer.)
Most photographic printers used in minilabs employ a subtractive method of printing. The subtractive method used secondary colored cut-off filters to end each individual layer's exposure. Again, the printer determines the length of exposure for each layer and then controls it through the use of these cut-off filters.
Example
A printing technician places a negative in the printing gate of the printer and then presses the normal density key to print, the
printer looks at the light, via its sensors, passing through the negative and then decides the total amount of time each of the layers should be exposed. That is, how long the red sensitive, green sensitive and blue sensitive layers should be exposed to produce a quality print. It determines that the red layer should be exposed for 250 milliseconds, the green layer for 290 milliseconds and the blue layer for 320 milliseconds. (A millisecond is a one-one thousandth of a second.) It then starts the exposure by opening an exposure shutter which allows light that is passed through the negative to strike and expose the light sensitive layers of the paper. After 250 milliseconds, the printer swings in the light path a cyan cut-off filter. The cyan filter absorbs the red light but allows the green and blue light to pass, thereby, ending the red layer exposure. Next, after 290 milliseconds have passed, a magenta filter enters the light path blocking or absorbing the green light ending the green exposure. The exposure shutter also closes at the same time the last cut-off enters the light path, ending the exposure.
Note: The intensity of the light is generally preset during set up and balancing of a printing channel. However, if the intensity of the light source was increased, an increase in dye density would result, as would a decrease in dye result in a decrease in light intensity.
Application
Printing technicians find color theory knowledge useful when the printer prints an unsatisfactory final print. An unsatisfactory print would be one that would fall outside of normal quality standards. That print must be reprinted.
The final print may be unsatisfactory for many reasons. The print may be too light or too dark, which is referred to as a density error. The printing technician merely reprints the negative using a density key other than the original one selected to bring the density of the final print with quality standards. In this case, color theory knowledge is not required. When a different density key is selected, the printer changes the filter cut-off times of all three filters equally to reduce or increase overall dye density in the final print. This yields no change in color.
A print may have the correct density, but be off color. Knowledge of color theory becomes very useful if the final print is not the correct color. Now, the printing technician must make a judgement as how to change the exposure to correct the color of the print. The technician will need to identify what color the print is biased towards. That is, toward what color is the print off colored. Does the print look too red? Does it look magenta? Does it look slightly yellow? Typically, the print will be biased towards one of the primary or secondary colors; red, green, blue, cyan, magenta or yellow.
Once the color bias is determined, a corrective course of action must be determined. A standard printer keyboard contains color correction keys. Your printer may have a correction key for each of the six colors or it may only have three; one for each secondary color. The color correction keys will allow the printing technician to vary the amount of exposure an individual light sensitive layer receives thereby changing the dye density in that layer. (Actually, the densities in all three layers are changed by the printer so that the overall density remains the same in the print, more on that in a later edition.) A color correction and the amount of that correction would be determined by the printing or quality control technician. The printing technician would enter that correction into the printer by selecting the correct color correction keys and then reprint the negative. If the correct correction was entered into the printer, a final print of good density and color balance would be the result.
Example
A customer's order comes off the paper processor, the quality checker looks over the order and decides that one of the prints is not the correct color; it is slightly green. If a print looks too green, the dyes are not absorbing enough of the green portion of white light that is reflected off the white opaque base of the print. The quality checker knows that magenta dye absorbs green light, therefore the print needs to contain a greater amount of magenta dye. The checker instructs the printing technician to reprint the negative with a color correction of a plus one button of magenta. (Typically a button of a particular color will change that color by about 10%.)
In essence, the printer will add about 10% more magenta dye to the print, thereby increasing the amount of green light the print absorbs and decreasing the amount of green light re-flected back to the viewer's eyes. Thus, a correctly colored print.
The printer does this by increasing the amount of time the magenta cut-off filter remains open, thereby increasing the green layer exposure. An increase in the exposure to the green sensitive layer will produce more magenta dye in the final print when the paper is chemically processed.
By increasing or decreasing the times of one or more of the three cut-off filters, any color bias may be corrected. Remember:
Red Biased Print - Add Cyan
Green Biased Print - Add Magenta
Blue Biased Print - Add Yellow
Cyan Biased Print - Subtract Cyan
Magenta Biased Print - Subtract Magenta
Yellow Biased Print - Subtract Yellow
Next Issue:
Printing & Negative Classification
Color Theory Quiz
1) The complement of magenta is ______________.
- red
- green
- blue
- cyan
2) A yellow filter will allow ____________ light to pass.
- green and blue
- red and blue
- red and green
3) A _____________ filter combined will pass only red light.
- cyan and magenta
- magenta and yellow
- cyan and yellow
- green and blue
4) A _____________ object will be represented by cyan and magenta dyes in the print.
- red
- green
- blue
5) An exposure consists of two variables; time and _______________.
- intensity
- density
- transmittal
- light
6) The printer's _______________ cut-off filter will end the red exposure.
- cyan
- magenta
- yellow
- dark
7) If a print is too red, the _________ cut-off filter time/times should be ___________.
- magenta and yellow; increased
- cyan; decreased
- red; increased
- cyan; increased
- cyan and yellow; decreased
8) A two button correction in color, will change that color by about ____________.
- 5%
- 10%
- 15%
- 20%
- 25%
answers:
1 = b
2 = c
3 = b
4 = c
5 = a
6 = a
7 = d
8 = d
Go To | Training Guide 1 |
Training Guide 3 |
Training Guide 4 |
Training Guide 5 |
Training Guide 6 |


Copyright 1996 Imation. All rights reserved.

|


